Archive
Microsoft Power Platform: Checking vaccine slot availability using the COWIN API and Power Automate
Recently government opened the vaccination for 18 – 45 years age group from May 1st. When I registered on Co-WIN portal and I tried to search the available slots for 18+ age group, but always I see the slot is filled up already. After searching I found that Co-WIN provides sets of API’s which are available openly for all the third parties. You can read mode at https://apisetu.gov.in/public/api/cowin/
I crated a Power Automate flow to check the slot availability and alert the use through email. I have used ‘calendarByPin’ API. Which provides us “vaccination sessions by PIN for 7 days”.
I have crated a SharePoint list which will hold the pincodes for which are checking availability of slots. You can use any other data source as per your convenience.

Flow will go through the list and check the availability for each pin code. I will not explain much technically, please find the flow screenshots of the steps in flow.
Current date variable will be set though following formula –
formatDateTime(utcNow(),’dd-MM-yyyy’)


The flow will look like end to end as –

I am attaching the exported flow Download and rename it to.zip before importing in to ‘Power Automate’.
You will get email like following, in your mailbox.

Points to be remembered –
- Co-WIN provides sets of API’s are provided by Co-WIN and it is getting used in the active ‘Co-WIN’ portal so please don’t hit the API’s with short duration. And choose the trigger duration wisely. I have set it to every 1 hr. You can change it as per your need.
- You can create an ‘E5 Office 365 E5 Trial’ site and import the flow. While importing you need to resolve ‘Office 365 Outlook Connection’ and ‘SharePoint Connection’.
- After importing flow, you need to select your site URL and list of pincodes to be selected.
- I have used API in Power Automate as no code solution, you can use other ways to pull data from API like windows application, Azure web job and other ways or scheduled Azure functions etc.
- The attached sample I am searching 18+ age slots, if you want to search for 45+ then do the changes accordingly in the Condition section.
- You also need to update your Email Id in the ‘Send an email’ step.
- Instead of sending email, you can use any other way like sending SMS alert or something other according to the availability of the operation.
- HTTP operation is paid operation in Power Automate but mostly your need will suffice with the E5 quota available for HTTP calls.
- The entire purpose of this article is just to make the idea that how we can utilize the power Automate in this scenario. I am not taking any responsibility of the data authenticity as we are just consuming the provided API.
- I have not done extensive testing of this flow but in some amount of testing it found to be working. Some fixes may be needed in some scenarios.
- The appointment availability data is cached and may be up-to 30 minutes old. Further, these APIs are subject to a rate limit of 100 API calls per 5 minutes per IP.
SharePoint 2013: Designer workflow error with ‘Call HTTP web service’ action
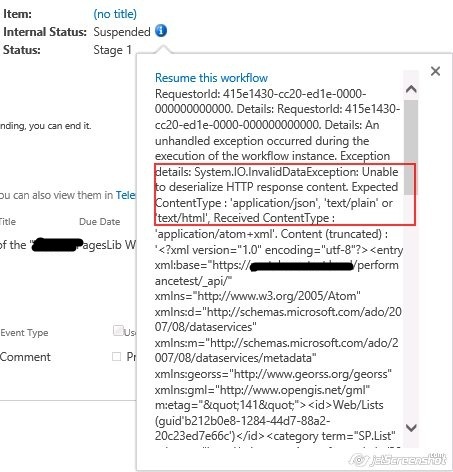
While working on one of the workflow development task, it was required to have a web service call to fetch data from SharePoint. To achieve that I used ‘Call HTTP web service’ action but with that I was getting following exception “Unable to deserialize HTTP response content. Expected Content Type: ‘application/json’, ‘text/plain’ or ‘text/html’”.
After struggling with this issue, the solution I used thought to share the solution with developer community.
Solution: The reason for the issue is, by default response from SharePoint REST is in XML and SharePoint designer workflow not able to parse the xml and needs JSON response. To resolve this issue we need to pass Accept and Content-Type as application/json;odata=verbose to request headers. This way we will get JSON response. To resolve this follow bellow steps.
- Go to SharePoint 2013 designer.
- Build a Dictionary variable named ‘WSHearder’
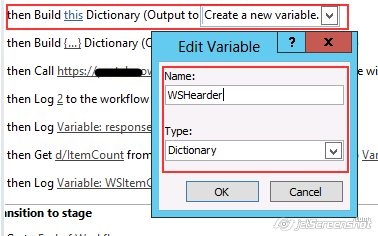
- Add two values in newly created dictionary
Content-Type = application/json;odata=verbose

- Now select ‘Call HTTP web service’ action and select Properties.

- Select newly created dictionary variable as value for ‘RequestHeaders’.

- Press OK and publish the workflow.

